• Skip to secondary menu
  • Skip to main content
  • Skip to primary sidebar

Cake Ideas 101

Easy Cake Decorating Ideas

Menu   ≡ ╳
  • Home
  • About Us
  • Books & Videos
  • Contact Us
  • Hobbies
  • Photos
  • Store

cake ideas

Cake Ideas – Edible Image Frosting Sheet Tips


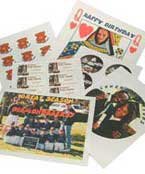
Cake ideas generated onto edible image frosting sheets can create decorated cakes that will never be forgotten. We have been using this style of decorating cakes for several years now and have come up with some tips we would like to share with others who either currently use them or are thinking about investing in them in the future.

  • There are a couple of different edible image frosting sheets we found, but we decided to go with ones that are on a slick backing that is released from the frosting sheet itself when you are ready to apply it to the cake. The other type is the actual sheet itself that is run through the printer. We were just personally uncomfortable with using this second type.
  • Before printing off the frosting sheet, run a sheet of copy paper through the cake decorating printer to test the printing to make sure there are not any missing dots or lines, or there will be lines on the printed design. Do a cleaning if necessary.
  • If the frosting sheet had dried out some to where the corner pops loose from the backing, lightly mist it with some water so it will adhere back to the sheet, and then let dry before putting through the printer.
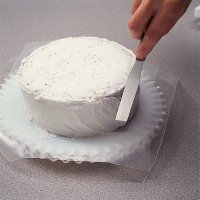
  • Use a spray bottle to lightly mist the top of the cake where the design is to be applied. If the icing has slightly crusted, this will allow the edible image sheet to adhere to the cake.
  • Right before applying the sheet to the cake, stick it in the freezer for about ten seconds. This takes any moisture out of the sheet to help release it from the backing.
  • If you are having trouble yet getting it to release, get a corner started with a fine paring knife with a flexible blade. You can then use your angled blade spatula to slowly and carefully slide between the sheet and the backing to release it. Normally it will just come right off, but we all like to be contrary once in a while 😉
  • When placing the sheet on the cake, try holding it directly above where you want it to be positioned because it is going to stick right where you put it, especially if you have spray misted the top of the cake.
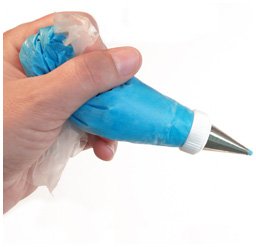
  • Use a star or shell design to go around the edges of the frosting sheet just to make sure they are sealed down and give the finished look to your decorated cake. Depending on the cake, we generally use white frosting for this or choose a color that is in the design itself to accentuate it, even if it's a minimal color you want to bring out.

Whether decorating cakes with traditional methods or with the new wave, we hope your choice or transition will be helped with these cake ideas.

Be sure to sign up for our FREE eBook “Cake Decorating: How To Go From Beginner To Expert” by subscribing to our FREE Monthly Bulletin at the top of the right side about decorating cakes, and to receive contest notifications, recipes, and cake ideas.

Cake Ideas – Edible Image Decorations

Great cake ideas can produce great results. Sometimes we invent those ideas in a 2-D effect rather than in 3-D. Basically it's like drawing a picture on a cake. That is where the edible image frosting sheets are so wonderful. Cake ideas have changed over the last few years with the introduction of these edible image frosting sheets. To think you can make decorated cakes with a thin sheet of frosting that has been run through a printer after generating the image on a computer is awesome! After decorating cakes the traditional, time-consuming way, we were ready to make the transition with eagerness. We researched the possibilities and found all we needed to get started was the necessary printer that would accomodate the frosting sheets. It had to be a new printer of a certain brand and model that had never had regular ink run through it. Then all we had to purchase was the food coloring ink cartridges and the edible image frosting sheets. It was not a bad investment at all for what we could now produce with much less time and effort.

Our 25th Anniversary Cake

This is a sample of what can be done with edible image cakes. This particular one was made for mine and my husband's 25th wedding anniversary. The program allows you to put your own photos on the edible frosting sheet that is designed on the computer and printed off. We will be posting other pictures regularly so you can see the possibilities with this way of decorating. We do know that with the edible image frosting sheets and all the possibilities, you can set to flow freely your cake ideas.

Be sure to sign up for our FREE eBook “Cake Decorating: How To Go From Beginner To Expert” by subscribing to our FREE Monthly Bulletin at the top of the right side about decorating cakes, and to receive contest notifications, recipes, and cake ideas.

Cake Ideas – The Traditional Decorations

"Squeezing all those stars example!"


Cake ideas can be a dime a dozen, but when it comes to getting it just right for the occasion, you may have to explore several options for decorating cakes. There is the traditional decorating that uses piped icing to make the design itself and the writing. Before we started doing edible image cakes, we did decorating the hard ways, as we call it. One way was squeezing out those thousands of stars all over the cake till it was completely covered. The other way was that we would get a picture of the design wanted, whether from a printed paper copy or a napkin that would be used for the party. We would tediously draw the design on the cake icing with a toothpick. Then we would load up frosting bags with various colors and accomplish our feat. After decorating in this manner for many years, we started hearing about a new style of decorating cakes with edible image frosting sheets. More of that is in our posting about decorated cakes called "Cake Ideas – Edible Image Decorations."

Be sure to sign up for our FREE eBook “Cake Decorating: How To Go From Beginner To Expert” by subscribing to our FREE Monthly Bulletin at the top of the right side about decorating cakes, and to receive contest notifications, recipes, and cake ideas.

Cake Ideas – Trimming the Cake


Decorated cake ideas can be found online, in books, or you can use your imagination to come up with your own that will brand you. Applying the trim on the cake is the first step to the finished product once the cake is frosted. The base edge trim is usually done with a star or round tip. The star tips used are tips #16 thru #22, and the round tips used are #8 thru #12. The size will depend on the look you are wanting and where you are applying it. Generally the larger size of tip is done for the base of the cake and a smaller size is then used on the edge where the top and sides meet. The star tip can be used to make the star or shell border, and the round tip makes a bead border. Most of the time we will use a smaller version of the same tip design to trim the top edge as the bottom. Sometimes it is hard to get that top edge consistently covered with the icing, so using the correct tip and pattern will help cover that edge. We personally prefer to use tip #18 and do a reverse rope pattern around the top edge. If you look in a Wilton book, it will show the rope pattern which looks like commas stacked next to each other. We do one "comma" one direction and then go in the undercurve and bring it around to a "reverse comma," then another comma and so on. Once you get the hang of it, it is pretty easy because it is just a flick of the wrist one direction, then the other. The trim is where you can use colored frosting to get the look you want. Depending on the theme or top design, you can make the bottom border one color and the top border a different color, or you can alternate the stars, shells, or beads back and forth between the two colors. Or if you don't want to distract any from the top design, you can just do both borders in white icing. Another option here is if you frosted the cake with white icing, you can use the food color spray from Wilton or Betty Crocker or Wilton to change the color of the icing. That should be done before applying the borders, and then those can be done in white, which really accents the cake. These are just a few cake ideas when decorating cakes to personalize your masterpiece.


Be sure to sign up for our FREE eBook “Cake Decorating: How To Go From Beginner To Expert” by subscribing to our FREE Monthly Bulletin at the top of the right side about decorating cakes, and to receive contest notifications, recipes, and cake ideas.

Cake Ideas – Frosting the Cake


There are several cake ideas when it comes to actually frosting the cake. At this point, the icing is probably already mixed up. There are several kinds that can be used, so it is totally a personal or customer preference. There's decorator icing, buttercream frosting, and rolled fondant. We have personally never used the latter kind. We prefer to use the tranditional decorator's icing with butter flavoring added. You can get more detail of this on our post entitled "Cake Ideas – Coloring the Icing." Well, it's finally time to get the icing on the cake after all the preparation and baking. The first thing we do is apply some icing under the bottom edges of the cake where it may not be setting flat on the board or plate. This helps fill the void where you are going to be putting the trim around the base of the cake. We sometimes thin the icing down a bit for actually frosting the cake just so it spreads on easier and is less likely to tear the cake or pick up any stray crumbs. One of the biggest things I have struggled with in the past with decorating cakes was getting the frosting smooth. We were told to use a frosting spatula dipped in hot water. Just by experiment one day, we tried using ice water to dip the spatula in, and we actually thought it worked better. Then a while back we were visiting with a fellow cake decorator and she asked us how we smoothed our frosting. We told her the two methods we had tried and she asked if we had ever used a pastry roller. Wilton actually carries something similar called a quick easy fondant smoother. Once the cake is frosted, you let it crust over just slightly and then use this roller on the top and then around the sides. We couldn't believe how slick that worked! We recently saw a video that had another cool trick. They laid a smooth dry paper towel over the slightly crusted frosting and used a fondant smoother, also available from Wilton, to 'iron' the frosting! They said if you wanted your frosting to have a texture or look lacey, just use a paper towel with a texture to it and that would imprint into the frosting. Now that the cake is frosted, the next step in making that beautifully decorated cake is getting all the trim and decorations on. The finished result can include many cake ideas which we will be sharing. 

Be sure to sign up for our FREE eBook “Cake Decorating: How To Go From Beginner To Expert” by subscribing to our FREE Monthly Bulletin at the top of the right side about decorating cakes, and to receive contest notifications, recipes, and cake ideas.
  • « Go to Previous Page
  • Page 1
  • Interim pages omitted …
  • Page 4
  • Page 5
  • Page 6
  • Page 7
  • Go to Next Page »

Primary Sidebar

BEST ICING RECIPE

Get Your FREE Decorator Icing Recipe: Just fill in the form below and hear your customers rave!"

Let’s Share Cake Ideas on Pinterest!

Follow Me on Pinterest

Where our visitors are from

free counters

TODAY’S BIRTHDAYS!!

Today's Birthdays! See who's celebrating today!

CAKE IN THE NEWS!

Current Cake News Continually Updated from Thousands of Sources Around the Net!

55 Cake Decorating Classes to Choose From!

Online Cake Decorating Class

Sites of Interest

  • Amazing Products 101
  • Family Research 101
  • My Internet Business Space

Something You Might Be Interested In