• Skip to secondary menu
  • Skip to main content
  • Skip to primary sidebar

Cake Ideas 101

Easy Cake Decorating Ideas

Menu   ≡ ╳
  • Home
  • About Us
  • Books & Videos
  • Contact Us
  • Hobbies
  • Photos
  • Store

Cake Ideas – Trimming the Cake


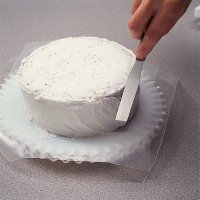
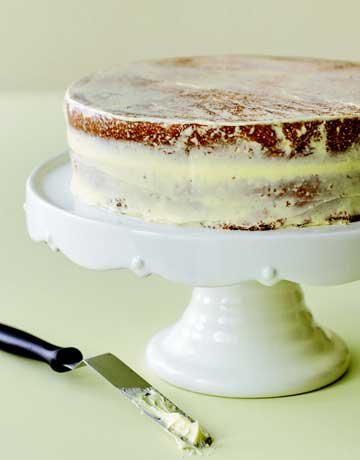
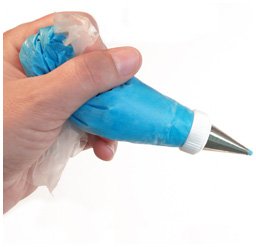
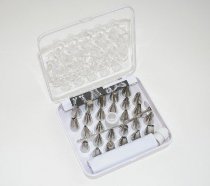
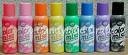
Decorated cake ideas can be found online, in books, or you can use your imagination to come up with your own that will brand you. Applying the trim on the cake is the first step to the finished product once the cake is frosted. The base edge trim is usually done with a star or round tip. The star tips used are tips #16 thru #22, and the round tips used are #8 thru #12. The size will depend on the look you are wanting and where you are applying it. Generally the larger size of tip is done for the base of the cake and a smaller size is then used on the edge where the top and sides meet. The star tip can be used to make the star or shell border, and the round tip makes a bead border. Most of the time we will use a smaller version of the same tip design to trim the top edge as the bottom. Sometimes it is hard to get that top edge consistently covered with the icing, so using the correct tip and pattern will help cover that edge. We personally prefer to use tip #18 and do a reverse rope pattern around the top edge. If you look in a Wilton book, it will show the rope pattern which looks like commas stacked next to each other. We do one "comma" one direction and then go in the undercurve and bring it around to a "reverse comma," then another comma and so on. Once you get the hang of it, it is pretty easy because it is just a flick of the wrist one direction, then the other. The trim is where you can use colored frosting to get the look you want. Depending on the theme or top design, you can make the bottom border one color and the top border a different color, or you can alternate the stars, shells, or beads back and forth between the two colors. Or if you don't want to distract any from the top design, you can just do both borders in white icing. Another option here is if you frosted the cake with white icing, you can use the food color spray from Wilton or Betty Crocker or Wilton to change the color of the icing. That should be done before applying the borders, and then those can be done in white, which really accents the cake. These are just a few cake ideas when decorating cakes to personalize your masterpiece.


Be sure to sign up for our FREE eBook “Cake Decorating: How To Go From Beginner To Expert” by subscribing to our FREE Monthly Bulletin at the top of the right side about decorating cakes, and to receive contest notifications, recipes, and cake ideas.

Cake Ideas – Frosting the Cake


There are several cake ideas when it comes to actually frosting the cake. At this point, the icing is probably already mixed up. There are several kinds that can be used, so it is totally a personal or customer preference. There's decorator icing, buttercream frosting, and rolled fondant. We have personally never used the latter kind. We prefer to use the tranditional decorator's icing with butter flavoring added. You can get more detail of this on our post entitled "Cake Ideas – Coloring the Icing." Well, it's finally time to get the icing on the cake after all the preparation and baking. The first thing we do is apply some icing under the bottom edges of the cake where it may not be setting flat on the board or plate. This helps fill the void where you are going to be putting the trim around the base of the cake. We sometimes thin the icing down a bit for actually frosting the cake just so it spreads on easier and is less likely to tear the cake or pick up any stray crumbs. One of the biggest things I have struggled with in the past with decorating cakes was getting the frosting smooth. We were told to use a frosting spatula dipped in hot water. Just by experiment one day, we tried using ice water to dip the spatula in, and we actually thought it worked better. Then a while back we were visiting with a fellow cake decorator and she asked us how we smoothed our frosting. We told her the two methods we had tried and she asked if we had ever used a pastry roller. Wilton actually carries something similar called a quick easy fondant smoother. Once the cake is frosted, you let it crust over just slightly and then use this roller on the top and then around the sides. We couldn't believe how slick that worked! We recently saw a video that had another cool trick. They laid a smooth dry paper towel over the slightly crusted frosting and used a fondant smoother, also available from Wilton, to 'iron' the frosting! They said if you wanted your frosting to have a texture or look lacey, just use a paper towel with a texture to it and that would imprint into the frosting. Now that the cake is frosted, the next step in making that beautifully decorated cake is getting all the trim and decorations on. The finished result can include many cake ideas which we will be sharing. 

Be sure to sign up for our FREE eBook “Cake Decorating: How To Go From Beginner To Expert” by subscribing to our FREE Monthly Bulletin at the top of the right side about decorating cakes, and to receive contest notifications, recipes, and cake ideas.

Cake Ideas – Crumbs and Glazing

A Glazed Cake


Here are a couple of cake ideas to use before applying the frosting for your decorated cake. Make sure to brush off any loose crumbs. If you don't do this, you will end up with the crumbs showing in the icing. If this happens with a white cake, it's not as bad though as with chocolate cake when it can make it look like you've used a chocolate chip frosting 😉 A damp paper towel can be used to pick up any loose crumbs from the cake and from the board or plate it is setting on. There generally aren't too many crumbs to deal with if it's a cake that has just been turned out of the pan, but if you have to do any cutting or trimming of the cake, that can be a different story. So if you are wanting to seal those crumbs, it is best to glaze it. To glaze the cake, just take some of the same icing you will be using on the cake and thin it down with a little water to a very easily spreadable consistency. It will not matter if crumbs get mixed in during this step because they will be covered up when applying the frosting. It is best to let the glaze do some drying at this point to let it start to crust over a little. There are many steps to take in getting your desired finished product when decorating cakes. Eliminating and covering up crumbs are just a couple of cake ideas that will help you produce your masterpiece. 

Be sure to sign up for our FREE eBook “Cake Decorating: How To Go From Beginner To Expert” by subscribing to our FREE Monthly Bulletin at the top of the right side about decorating cakes, and to receive contest notifications, recipes, and cake ideas.

Cake Ideas – Colored Frosting Tips

Decorating cakes can be done to make them look elegant or simple. One thing that adds to the look is the colors that are used. Sometimes just using white icing to trim out the edges and borders on the cake makes it have that finished look, but does not distract from the main design or decoration. If you do use colored icing, here a few ideas that may help. It is important to remember that the longer the icing sets, the darker the shade it will be. As the air dries it, it will darken somewhat. This little hint needs to be remembered when you run out of a color and need to mix up more. Leave it just a minute shade lighter and it will darken and hopefully match what you had before. One other thing we found out the hard way, that we will mention here since talking about colors changing, is that if you are going to transport cakes in a vehicle for any distance, make sure to cover it up if at all possible. We are not sure if the sun affects all colors, but we do know from experience that purple frosting will turn blue. When transporting our son's wedding cake 75 miles away, the sheet cakes were in the cake boxes with the clear plastic insert in the lid. One of their wedding colors was purple, so we put purple rose buds on the cakes. Where the sun shown in the vehicle, it faded the pretty purple rose buds to a cornflower blue. Where the edges were covered by the cardboard of the box lid, it was fine, but where the plastic was it was no longer their wedding colors. So those cakes got served last!

This sheet cake was one that the flowers changed from lavendar and purple to  shades of blue. And the big one we were really nervous about transporting 75 miles. 🙁 We do keep on hand the basic colors of the Wilton tubes of colored icing. All you have to do is take off the cap and put on a tip and coupler ring designed for that purpose. We have found that if we set the tube in a cup of hot tap water for several minutes that it will make it much easier to squeeze out of the tube. These tubes can be a great time saver if you are needing a small amount of certain  basic colors. Another thing we use occasionally are the cans of food color spray. Both Wilton and Betty Crocker carry these. If you frost the cake with white icing, you can use it like spray paint to change the color of the icing. We generally use it as just a light mist – just enough to give it a little color. This can be a great time saver and it comes in the basic colors of Red, Blue, Yellow, Green, Violet, Pink, Black, and Orange. Colors can make the cake. As with painting a room or a house, it says something about the person the cake is for. Have fun with the colors, and people will be impressed with your decorated cakes. 

Be sure to sign up for our FREE eBook “Cake Decorating: How To Go From Beginner To Expert” by subscribing to our FREE Monthly Bulletin at the top of the right side about decorating cakes, and to receive contest notifications, recipes, and cake ideas.

Cake Ideas – Coloring the Icing

In our earlier post of "Cake Ideas – the First Steps," we talked about the frosting. Decorator icing can be mixed up several days in advance and stored in the refrigerator. It will also keep for several weeks in the fridge, as there is nothing in it to spoil. It's best to get it out the night before using it so that it is room temperature. If you have not mixed up your colors before baking the cake, now is the time to do so in order to begin decorating cakes. We personally use the paste food colors that are put out by Wilton. They have many colors available. When we first started decorating cakes, all they had were the basic colors of blue, green, red, and yellow, with maybe a few popularly requested ones. So sometimes it was very hard to get the desired color with just trial and error. Now they carry variations of the basic colors, including: Ivory, Daffodil Yellow, Buttercup Yellow, Golden Yellow, Lemon Yellow, Copper, Creamy Peach, Rose Petal Pink, Terra Cotta, Orange, Red-Red, Christmas Red, Red (no taste), Rose, Burgundy, Pink, Violet, Delphinium Blue, Cornflower Blue, Royal Blue, Sky Blue, Teal, Kelly Green, Leaf Green, Moss Green, Juniper Green, Brown, and Black. Wow – no more trial and error on those colors! We did however, run across a chart that gave some colors and what it takes to make those. We want to share this for others who have struggled to come up with a certain color.

  • Aqua – 5 parts Sky Blue, 1 part Leaf Green
  • Avocado – use Moss Green
  • Chocolate Brown – add a small amount of Golden Yellow to Brown icing
  • Dark Brown – add Brown; with buttercream icings, you get best results when cocoa or melted chocolate pieces are used before adding Brown color.
  • Chartreuse – 9 parts Lemon Yellow, 1 part Leaf Green
  • Flesh – Add just an extermely small touch of Copper to White icing
  • Antique Gold – Add just an extrememly small touch of Leaf Green to Lemon Yellow icing
  • Warm Gold – Add just a touch of Red-Red to Lemon Yellow icing
  • Gray – Add just a touch of Black to White icing
  • Lavendar – 6 parts Pink, 1 part Violet
  • Navy Blue – Mix in a large amount of Royal Blue until a deep blue is achieved, then add a very small amount of Black
  • Peach – Mix equal parts of Lemon Yellow and Pink
  • Raspberry – Mix equal parts of Pink and Red-Red; use enough color to get a rather deep effect
  • Red – Add Pink until a hot pink color is reached; then add Christmas Red or Red-Red until desired shade is achieved
  • Rust – Mix enough Orange until a bright orange is obtained; add Christmas Red until color is dark; then add a very small amount of Royal Blue
  • Salmon – Add an extremely small touch of Orange to Pink icing
  • Silver – It is not advised to simulate silver color in icing; instead, add silver leaves or other silver accessories to the cake
  • Turquoise – 9 1/2 parts Sky Blue, 1/2 part Lemon Yellow

You will obtain the best results when coloring frosting if you use the white or original Crisco for your icing. We like the butter flavored Crisco because of the flavor, but it tints the icing a yellow shade which can in turn alter what you are trying to achieve in your color. So instead, we use a small amount of butter flavoring when we mix up the icing. This way the frosting stays white, but we get the wonderful butter flavor. Remember that color will put the finishing touch to your decorated cakes.

Be sure to sign up for our FREE eBook “Cake Decorating: How To Go From Beginner To Expert” by subscribing to our FREE Monthly Bulletin at the top of the right side about decorating cakes, and to receive contest notifications, recipes, and cake ideas.

  • « Go to Previous Page
  • Page 1
  • Interim pages omitted …
  • Page 9
  • Page 10
  • Page 11
  • Page 12
  • Go to Next Page »

Primary Sidebar

BEST ICING RECIPE

Get Your FREE Decorator Icing Recipe: Just fill in the form below and hear your customers rave!"

Let’s Share Cake Ideas on Pinterest!

Follow Me on Pinterest

Where our visitors are from

free counters

TODAY’S BIRTHDAYS!!

Today's Birthdays! See who's celebrating today!

CAKE IN THE NEWS!

Current Cake News Continually Updated from Thousands of Sources Around the Net!

55 Cake Decorating Classes to Choose From!

Online Cake Decorating Class

Sites of Interest

  • Amazing Products 101
  • Family Research 101
  • My Internet Business Space

Something You Might Be Interested In